


Felted Pocketbook (Knit and Crochet Versions)
**If you like my blog and patterns, please vote for me on the Crochet and Hook list. Vote by clicking the blue box towards the top in the left margin of my blog. Thank you so much!! Let me know what you think of my patterns -- just click the email link (also in the left hand margin).**
A couple of months ago I made a Booga Bag using Noro Kureyon wool, and I just love it. A picture of my Booga Bag is here. I finally got around to making a matching smaller pocketbook to hold my credit cards, etc. I always seem to have to root around in my purse to find my pen, credit card, receipts, folding money, etc. So I made this bag to go inside my purse to hold all those things. :) No more sifting down to the bottom of my bag to find my credit card again!
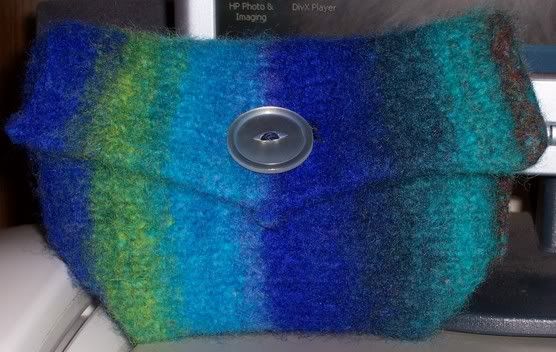
Here's a picture of the knitted version:
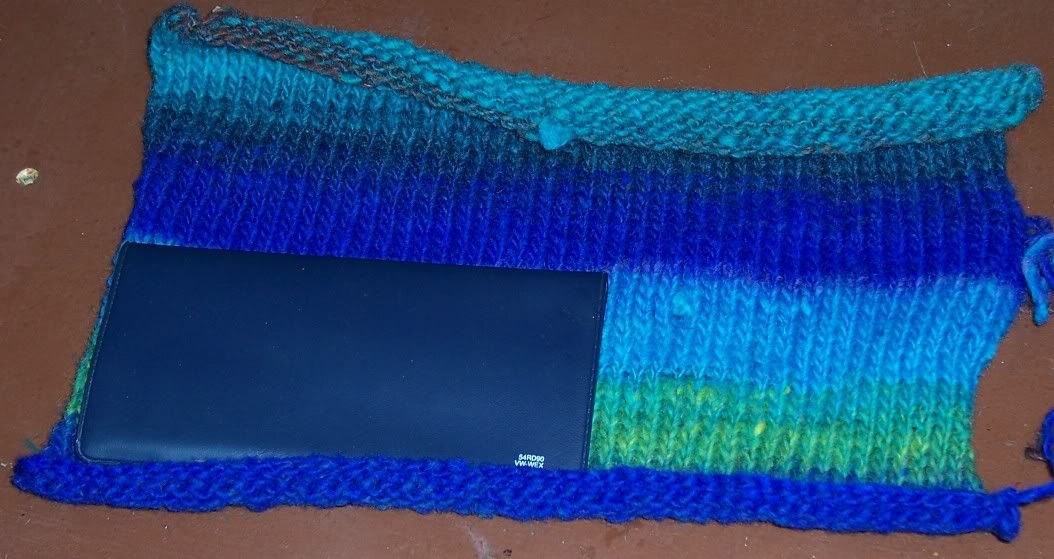
Before felting, the piece was about 10 inches by 12 inches. Here's a picture of it before felting. The checkbook gives you an idea of how large the beginning piece was.
After felting, the bag is almost exactly the size of my checkbook, not including the flap. I put it through hot water wash/cold water rinse 3 times, and shrunk to about half its original size. Different brands of wool shrink differently, so you might get varying shrinkage results.
The pattern can easily be adjusted to make a larger bag....just make your beginning piece larger. I always estimate it will be about half the beginning size when the felting is done. And a strap can easily be added by making a length of I-cord, or single crochet stitches and attaching the straps to the sides after felting. I didn't make a strap for mine since I wanted to use it as a small pocketbook inside my larger purse.
The basic pattern and assembly is really easy! :) Feel free to email me if you have any questions. There are both knit and crochet versions below. The stitch counts listed are for a small bag, like I made.
***The usual disclaimer: This pattern is an original work by Juli Wyant, and is wholly owned by her. This pattern is provided for personal use only, and can be printed for your personal use only. Please do not copy this pattern to other websites/blogs/groups, or distribute copies -- but feel free to link to this page. Yes, you can make items for sale from this pattern....but please don't sell the pattern itself, or present it as your original work. Yadda, yadda, yadda. We all know the copyright drill. ***
KNIT VERSION:
Small amount feltable 100% wool (i.e. not superwash wool....it won't felt)
thick cardboard or foam board for blocking
blocking pins
scissors, yarn needle, etc for weaving ends and sewing seams
large button
Heavy duty thread (or crochet thread) for attaching button and for around buttonhole
sz 10 knitting needles
Cast on 50
Work in Stockinette stitch (1 row K, 1 row P) until piece measures approximately 12 inches high
Bind off
FELTING AND FINISHING:
I do my felting by putting the item in a pillowcase and shutting it tightly with a thick rubberband. I toss in a couple pairs of jeans or bath towels, and check after each hot water wash/cold rinse to see if the felting process is done. When it looks fuzzy and you can't see the individual stitches anymore, it has achieved felting nirvana. :)
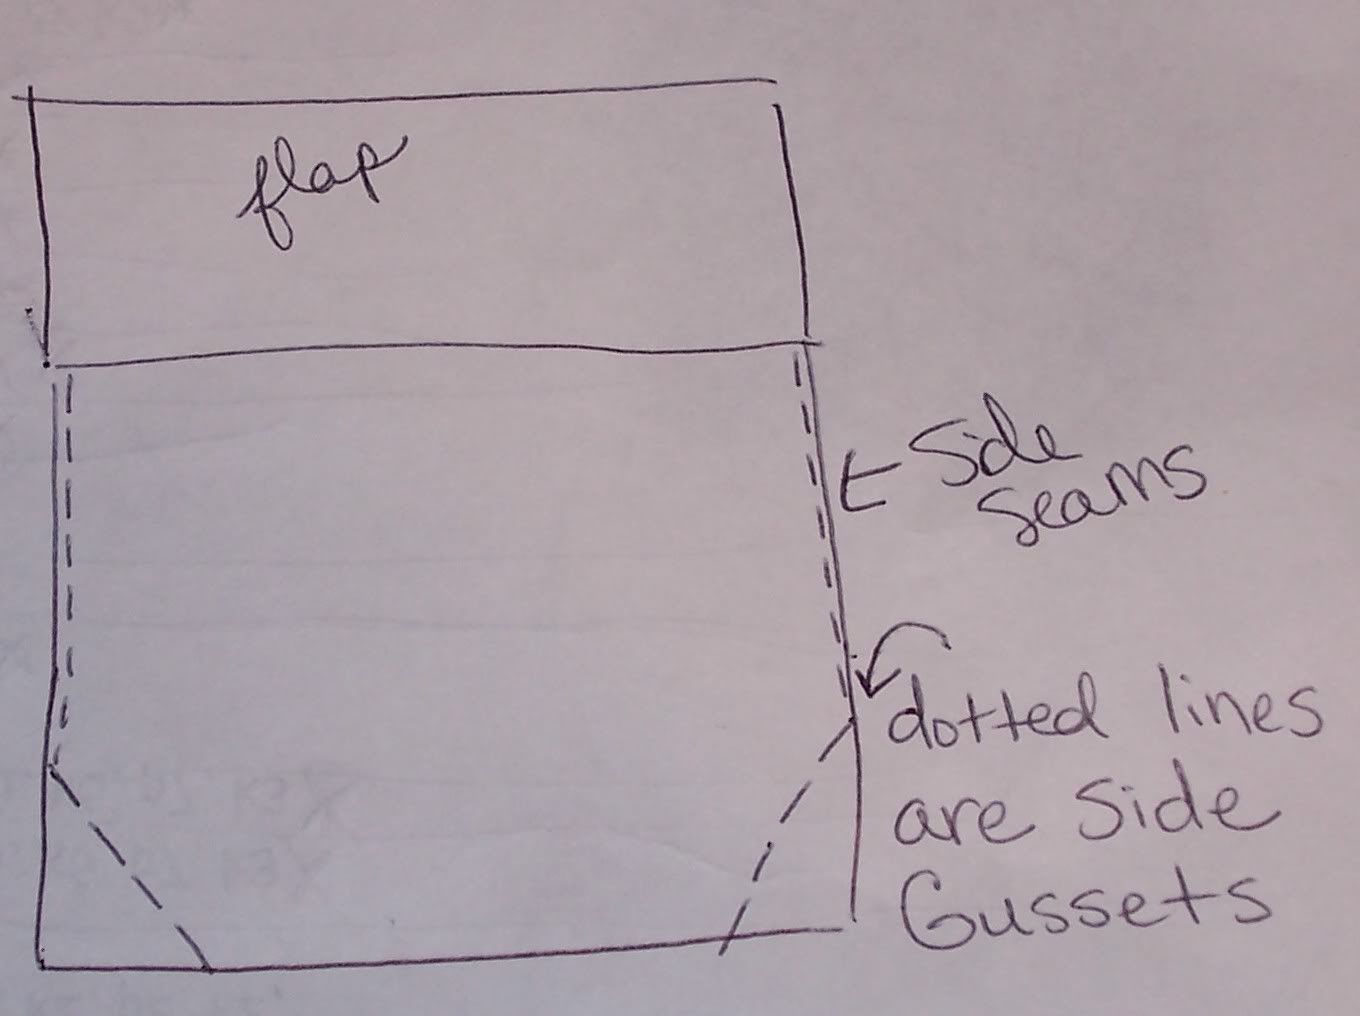
After felting, stretch the piece out flat on a thick piece of cardboard or foam board. Tug lightly on all sides to make sure the piece will dry flat and with straight sides. Pin both long sides and one short side. On the remaining short side, pin the two corners and in the middle gently pull up and pin so that the side will dry with a slight point in the middle (see picture of finished bag). I used two pins to make sure the point was held in place. Let the bag dry for about a day, then unpin.
Fold the piece with the right sides together (wrong side out), leaving about 3 inches at the top for the flap. Starting at the open edge, stitch the side seams using leftover wool or a coordinating color of yarn and a yarn needle. Stop about 1 inch from the folded edge and sew diagonally to the fold, forming a gusset. This forms the bottom of the bag.
Here's a diagram that hopefully makes the directions more clear:
Using scissors, cut a hole in the flap of the bag slightly smaller than the large button you will be using. Using a coordinating color of thread, sew around the button hole with an overcast stitch to prevent tearing. Fold down the flap to see where the button should be sewn, then securely attach the button onto the front of the purse.
CROCHET VERSION:
Small amount feltable wool (not superwash)
Size H crochet hook
Coordinating color of thread
1 large button
Scissors, yarn needle, etc for sewing
cardboard or foamboard for blocking
blocking pins
Chain 40 (or # needed to make piece about 10 inches wide for small bag)
Sc in 2nd ch from hook and across, ch 1 turn
Repeat this row until piece measures approx 12 inches high (or size needed)
Finish off and weave in ends.
**See Felting and Finishing section of Knitted version above for finishing instructions**
If you have any questions or comments about this pattern, feel free to email me at juliwyant@bellsouth.net !!
posted by Juli @ 2:29 PM
![]()
<< Home